Upcycled furniture ideas
- Andy
- Feb 5, 2021
- 3 min read

As of today (Feb 2020) we’re in the middle of Lockdown 3. What better time then to try a little upcycling to fill your time? It’s usually relatively cheap to do, fun and really satisfying.
Over the years, I’ve done no end of upcycling projects. I started many years ago when I was buying things at auction and I think my very first project was an old wooden coffee table which I painted then sprayed on a pattern round the edge using a stencil. It probably wasn’t my finest work but I was pleased with it and it was only for use in my own house so it was fine. Actually, thinking about it, that was my second attempt, the first was with the same table when I tried to create a marble effect on the table top but it didn’t work and looked pretty rubbish. The beauty of painting furniture though is that if you don’t like it or you tire of it, you can just paint it again. If you change your colour scheme or décor, or it gets a bit knocked about over the years, just paint it again.

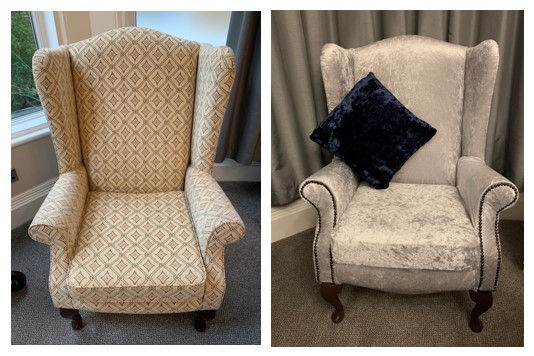
I’m a real hoarder and I hate to throw anything out. When I have a solid well built piece of furniture, it seems ridiculous to get rid of it just to get something else in a different style to suit the room better when it probably won’t be as well made. Antique furniture is usually particularly well made by crafts people and if it’s already lasted 50-100 years, then it’s likely to last many more. If your piece of furniture or anything for that matter that you’re thinking of upcycling is an antique, and in good condition, it may be worth double checking it’s not worth something and better sold than destroyed. You’d hate to go painting and recovering a chair then find it was a Chippendale worth thousands!

So, what can you paint? Well, almost anything can be painted – I’ve painted picture frames, mirror frames, chairs and various bits of furniture like wardrobes, chest of drawers, tables and desks. I usually use a proper chalky furniture paint like Autentico (my favourite) or Annie Sloane. You can get cheaper alternatives from places like B&Q but I’ve not used these. I have used just normal wall paint too but not had these items long enough since completing the project to comment on their suitability long term or their durability.

Whatever you paint, it’s worth prepping properly. With an ultra shiny surface it’s worth a quick light sand to create a key for the paint but with furniture paint, it’s not usually necessary. Then wash with a sugar soap solution, wash down with clean water, then ensure it’s dry before starting. This removes any dust and dirt. I usually use a small paint roller and tray for a better finish than a brush for any larger surfaces. You only need a small amount each time. It’s better to build up the layers and do three to five coats - they dry quickly so you can usually recoat within an hour. Once the paint’s properly dry, you need to paint with at least three coats of hard waring varnish to protect it. I would usually leave it at least overnight before I start varnishing. Once you have finished varnishing you ideally want to leave it a couple of weeks before putting anything on a surface so it can harden properly.
The options are endless as far as design is concerned. Why not sprinkle on some glitter before you varnish over it? Changing knobs and handles can really transform a piece too.
I hope this blog has helped inspire you to go and have a go yourself. Good luck. Have fun and don’t forget to tag us in your social media before and after shots.

Comments